(This page is updated from time to time as Google changes things and info below is current as of September 2025, which is when this page was last updated.)
You may be asking yourself, how are we able to figure out the titles and names of the artists for a lot of the puzzles we sell? With no signed names and so many artists out there, it would seem like a puzzle!
Well, the answer is surprisingly simple, it’s this little secret search engine called Google. Okay, so we know Google is a secret to nobody, however, Google’s amazing Image Search feature is a lesser known part of Google that any collector of puzzles should be aware of. In fact, it’s an incredibly useful tool for all sorts of things that you might need to search by image (artwork, board games, just about anything!), but for the purposes of this blog, I am going to teach you how to use it for finding a puzzle image.
Note: This is going to cover using this on a laptop or desktop. It works very differently on a phone and is not as easy to use, thus the reason for the desktop/laptop tutorial. We find it’s easier to find the information quicker, but also a little harder to use as well, so hopefully after getting through this tutorial you will have a good idea how to research those puzzle photos!
So here it is…Finding that Puzzle Image in a Few Short Steps
Step 1
Open your web browser and go to https://images.google.com

Step 2
Click the camera icon

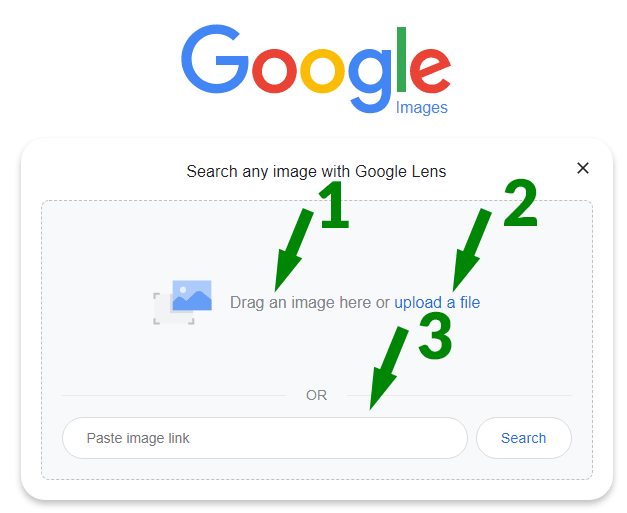
Step 3
Upload/Add Your Picture
You now have 3 different ways to get the image you want to Google:
1) Drag an image from a folder on your computer
2) Upload a file from your computer
3) Point to URL of a photo on the web
Step 4
Let Google do its magic and come back with results.
In this example we are using a picture of a puzzle by Grant Wood called “The Midnight Ride of Paul Revere”.
Bonus Tip: Image search works best when you have a nice cropped image without extra items in the picture, it is well lit and, well, just a good picture!
The larger image the better, so if you can take the picture in a higher resolution (at least 1000 pixels wide) you have a much better chance of getting good results.
The initial results page will look something like the screenshot below. There are tools to refine the process which we are going to discuss below.
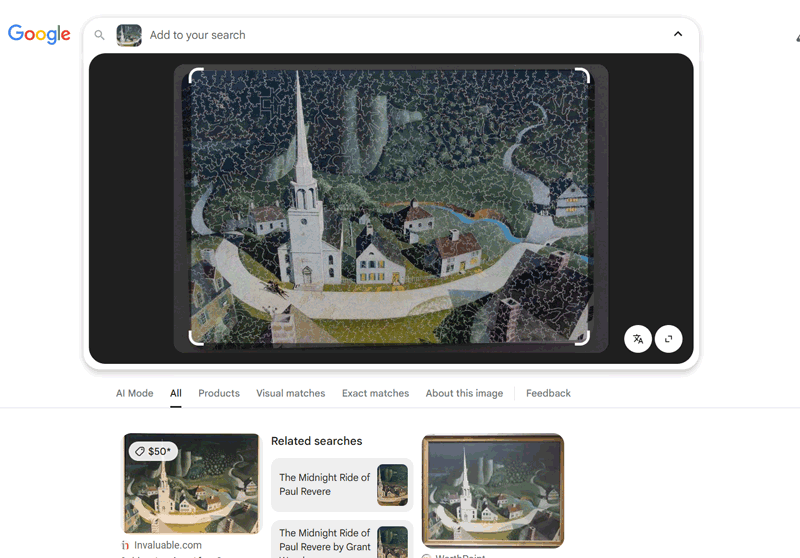
Let’s dig a little deeper in understanding your results:
A) Left Pane of Results
This is the image you uploaded. You will notice that Google has framed in a small part of the image (the white boundary with the rounded edges). We will discuss using this to refine results in a minute.

B) Results Below Image
These are some examples of typical search results related to the image. These are usually a good first start to make sure the image you have is the same one Google thinks you do. You will see some variation from this example in how the results display, but generally you should see something like this with some other images from various web sources.

C) How to Get More Results or If the Results are Inconclusive
At this point you may have enough info and be satisfied, congrats your search is complete! However, if you want more info, or you need to provide Google with some additional context in the form of text to have it search better, here are some things you can try:
1) In addition the results that appear below, there are several menu options right below the image you uploaded you can click through that will give you some different ways to filter and see other results. It’s worth going through these if you aren’t having luck with the initial results.

2) Remember earlier we talked about the white frame around the original image? You can actually resize that and have a different amount of the picture selected. This will give Google more information to base the search on and you may get better results. It’s a simple drag and select and it will automatically update the results below based on what you select, a pretty cool tool!

3) Another way to help further refine the search if you are really getting nowhere is to use the search bar at the top. Maybe you have a suspicion of the artist’s name or you can add some details you know may help such as “mid-century travel poster”. Use it like a normal text search to provide more context.

Bonus Tips
Not finding your image?
1) You might need to redo the search with a new photo. Sometimes the quality of your photo can make a big difference. Try using better light with no glare, that can really help when searching.
2) We have found AI can also be a good source with a prompt like “This is a picture of a puzzle I am trying to find the name of the painting and the artist’s name” as well as uploading the image. However, it’s not a simple process to refine the results if it’s not finding anything and you also should verify it’s correct with a Google search, so, at least as of Sept of 2025, Google Image Search is still our search tool of choice for solving this puzzle.
Quite a lot of options when looking for that special puzzle image. At first it can be a bit overwhelming to use, but with a little patience you should get the hang out of it. Obviously image search is a lot more complicated for a search engine than plain text, so it doesn’t always find the image, but I have had a pretty good success rate with a little creative searching if the image itself is not generating relevant results. There are some times where you may have to research it with other search engines too!
Good luck picture hunting!